

 |
| How to download and install the printer or scanner driver for Macintosh OS X |
Download and install the printer or scanner driver for Macintosh OS X
How do I download and install the printer or scanner driver for Macintosh OS X ?
If drivers are not listed for a specific operating system for your machine, then the unlisted operating system IS NOT supported with that machine.
The available connection method will vary depending on your machine's specifications.
To determine which operating system and connection methods your machine supports, please view the specifications at: http://www.l0ve.info
STEP 1 : DOWNLOAD THE DRIVERS
1. For instructions on how to download the Printer Driver & Scanner Driver, refer to the solution: "How do I navigate the Brother website to download software, drivers, and utilities?"
2. Once the download is complete, the Installer Disk Image will be mounted on your Desktop. You will find the installer package icon on the desktop or under the downloads folder.
3. Depending on your connection type:
- For local users, connect the USB cable into your machine and your Mac. Ensure that the machine is powered on.
- For Wired network users: Ensure that the network cable is connected between your machine and access point.
- For Wireless users: Ensure that the machine has already been connected to your wireless network. Refer to a solution for: How do I join the Brother machine to a Wireless Network?
STEP 2 : INSTALL THE SCANNER DRIVER
1. Double click the installer package icon BrotherTWAIN.pkg.

NOTE: You may receive a message stating that the driver package cannot be opened because it is from an unidentified developer. If this happens, you can still open the driver package by completing the following steps:
- Hold down the Control-key and click the installer package file.
- Choose Open.
- Choose Open again. The installation will begin.
2. On the welcome screen click CONTINUE.
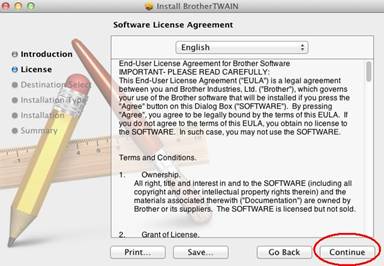
3. On the software license agreement screen click CONTINUE.

4. When the message appears stating: To continue installing the software you must agree to the terms of the software license agreement. Click AGREE.

5. If you are prompted to Select a Destination, choose your disk drive and click Continue.

NOTE: If you do not receive this window, then continue to the next step. If you want to configure the install's destination, you may click "Change Install Location" on the next screen and you will receive this option.
6. On the Standard Install screen click INSTALL.

7. When prompted, enter your admin password to complete the install.
NOTE: If the DeviceSelector appears automatically, continue to PART 2 STEP 9.
8. If you are prompted to do so, reboot the Macintosh.
9. For instructions on how to launch and use the DeviceSelector scanning application, refer to: How do I launch and use the DeviceSelector in Macintosh to configure the scanner?
PART 3: INSTALL THE PRINTER DRIVER
1. Double click the installer package icon "xxxxxxxx.pkg".

NOTE: You may receive a message stating that the driver package cannot be opened because it is from an unidentified developer. If this happens, you can still open the driver package by completing the following steps:
- Hold down the Control-key and click the installer package file.
- Choose Open.
- Choose Open again. The installation will begin.
2. On the welcome screen click CONTINUE.
3. On the software license agreement screen click CONTINUE.

4. When the message appears stating: To continue installing the software you must agree to the terms of the software license agreement. Click AGREE.

5. If you are prompted to Select a Destination, choose your disk drive and click Continue.

NOTE: If you do not receive this window, then continue to the next step. If you want to configure the install's destination, you may click "Change Install Location" on the next screen and you will receive this option.
6. On the Standard Install screen click INSTALL.

7. When prompted, enter your admin password to complete the install.
8. Once the install completes, reboot the Macintosh.
9. Add the Printer Driver:
- USB users, connect the USB cable directly from the Macintosh to the Brother machine.
- Network Users (With a built-in network card): You must first connect the Brother machine to the network before attempting to add the drivers.
a. Click on the Apple icon.
b. Click the System Preferences icon.
c. Click Printers & Scanners.
NOTE: Depending on your operating system, this destination may instead be called Print & Fax or Print & Scan.
d. Click the + (Plus) to add the driver.

e. Click the Default icon which is located at the top of the window.

f. Select your machine from the Printer Name list.
- For the CUPS Driver: Make sure that XXXXXXX CUPS is selected in the Print Usinglist. (Where XXXXXXX is the printer model name.)
- For PostScript Driver (not available for all models): Make sure that XXXXXXX BR-Script is selected in the Print Using list. (Where XXXXXXX is the printer model name.)
NOTE: If you select the AirPrint driver, then you will not have the full functionality of the printer driver. Instead, we recommend you choose the CUPS Driver for the most commonly used features.
If your machine is not in the list, make sure repeat from PART 1 and download the drivers again. Make sure that the machine is connected either to the computer (local connection users), or to the network.
g. Click Add. The Brother machine is now available in the list.

